|
Nana C++ Library. Reference for users.
What we need to use nana
|
|
Nana C++ Library. Reference for users.
What we need to use nana
|
See also:
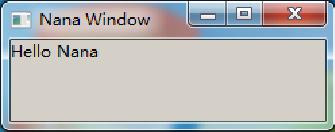
This chapter shows how to create an small graphical user interface (GUI) application with Nana C++ Library.
Let's start with a simple program, we will study it line by line.
Lines 1 and 2 include the definitions of class form and class label in namespace nana. Every GUI application written with Nana C++ Library must include the header file nana/gui/wvl.hpp.
Line 5 defines a nana::form object. It is a window used for placing a label widget in this example.
Line 6 defines a nana::label object to display a text string. The label object is created in the form. A widget is a visual element in the user interface.
Line 7 sets the caption of the label object. Every widget has a "caption" to display a title or similar function, like a text in a label.
Line 8 makes the form visible.
Line 9 passes the control of the application to Nana. At this point, the program enters the event loop for waiting for and receiving a user action, such as mouse move, mouse click and keyboard press. The function nana::exec blocks till form is destroyed, and what the example demonstrate is that the program exits when a user closes the window.
Now, you can run the program on your own machine. But firstly you should have Nana C++ Library installed in your system. A method to install is explained in Installation Library Documentation in Nana Programmer`s Guide or in the wiki
The second example shows how to respond a user action. To receive a user action, an event handler should be registered to a widget. Nana waits for a user action and invokes the event handler of the corresponding event. This example application consists of a button that the user can click to quit.
This source code is similar to Hello Nana, except that we are using a button instead of a label, and we are making an event to respond a user click. Every widget class has a set of methods to set events handlers. They are named "events()". The parameter of the member function is an event handler. As above code shown, we set nana::API::exit_all() as an event handler for the button's click event. The exit_all() function is one of the nana::API functions offered by the Nana C++ Library. It closes all windows in current GUI thread and terminates the event loop. In this example it will be called when the user clicks the button.

This is an small but working notepad:
A few comments:
menubar and a textbox, and to set the layout.
_m_pick_file() is to tell user to select a file.
fbox.show() returns an empty vector of file names.
fs is empty, the program asks the user to select a file to save the text.
This chapter shows two basic concepts: function objects and lambdas. A Function Object, or Functor (the two terms are synonymous) is simply any object that can be called as if it is a function. It can be an object of a class that defines a member function operator().
The function object is an impressive technology. A function object is a more general concept than a function because a function object can have state that persist across several calls and can be initialized and examined from outside the object, unlike a static local variable. For example:
std::for_each() returns a copy of the object sum, and we are able to retrieve the state or result.
On the basis of the feature that function objects retain its own state, it is easy used for concurrent process, and it is extensively used for providing flexibility in the library implementation. To make the framework flexible enough, Nana C++ Library uses the general std::function class template. There are four different types of event handlers that can be processed. It is flexible and reduce the complexity of study and use.
But creating a functor object is not required. Using functions directly is also allowed:
Or more elaborated:
A lambda expression is a mechanism for specifying a function object. The lambda is a feature introduced in C++11. The primary use for a lambda is to specify a simple action to be performed by some functions. For example:
The argument:
is a "lambda" (or "lambda function" or "lambda expression") in C++11 language. A lambda starts with plain [], and the compound-state block {} defines a function body. In fact, A lambda defines an anonymous function object, and therefore a lambda could be invoked through a function-call syntax. The use of lambda is creating an anonymous function object and so arguments can be specified. For example:
The lambda-declarator () is used like a parameter-list. Let's stop the introduction to the lambda, if you want more details of lambda, please refer to other C++ documentation.
This chapter will teach you how to create a window using Nana C++ Library. A window is a visual element in the operation system or window environment. Form is a window that like a container can contain other widgets, such as button, textbox and listbox. Every GUI program created with the Nana C++ Library need to create one form at least, as in examples of chapter 1. Many forms are created by creating an instance of form. This way of creating a form is easy, but it will make your program complicated if you want to create a bit larger program.
Nana C++ Library is implemented using Object-oriented methods. We can define an own form by deriving from nana::form.
Our first example is a Monty Hall Problem. This is a game that tests you whether change your choice after you picked a door to win a new Car.
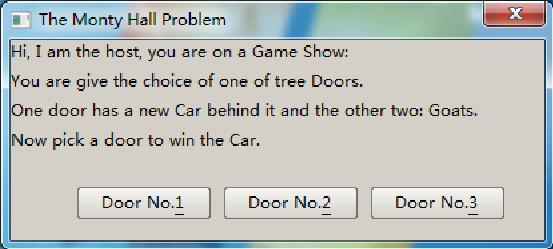
Let's start creating this application. First we are going to design architecture for the application. As we saw in figure 3.1, the application needs a form, a label and three buttons.
MontiHall.cpp Lines 1 to 4 include the headers that are required by this application. The wvl.hpp provides the basis of Nana C++ Library that all GUI program required. label.hpp and button.hpp include the definitions of label and button, and we will specify the door which has the new Car randomly by using timestamp() - function provided in platform.hpp.
Lines 6 to 21 define the class monty_hall derived from nana::form. In other words, class monty_hall is defined as a form and we will put all handlers in this class scope to keep the program clear.
Line 9 defines a state type that contains three states. state_begin is a state that indicates the first pick, state_picked indicates the second pick, and state_over indicates the result.
Line 11 declares a default constructor. It will initialize the widgets and set the initial state.
Line 13 declares a private member function to respond the user action on buttons.
Line 14 and 15 declare two private member functions which handle the game logic. We will define them later.
Lines 17 to 20 define the data members including label and buttons. The integer member door_has_car_ indicates the number of the door which has a car behind it.
Lines 23 to 28 define the main function; an object of class monty_hall is defined, sets the form visible and enters the event loop.
Let see the default constructor and three private member functions.
Line 30 and 31 initialize the base class of monty_hall. make_center() is a function that returns a rectangle that specifies an area in the center of screen with size of 400 X 150. The typedef name appear is used for the abstraction of form appearance. The appear::decorate defines the form with caption bar, border, a close button and displaying in taskbar.
Line 17 initializes the state.
Line 33 sets the caption of form.
Lines 34 to 37 define a text that describes the game information.
Line 39 and 40 create a label widget and set the caption of label. The label will display the text which is defined in line 34.
Line 41 and 42 define a string array which contains the names of three doors.
Lines 43 to 48 create the buttons in a loop, and set the caption, make a click event for three buttons.
On line 51, the member function has a parameter, eventinfo that contains the event information, such as which widget the event is taking place. We need the information to determinate which button is clicked, because the event handler of the three buttons is one and the same.
Lines 53 to 59 find the index of the button which is clicked. The button which is click is specified by ei.window. _m_play() handles the logic of game.
Line 60 defines the _m_play() to handle the logic of this game, it contains a parameter to indicate what the number of door is picked. There are two states we would handle, state_begin indicates the first pick, and now, program should put the car behind a door randomly, use the timestamp() function to retrieve the number of milliseconds that have elapsed since system was started, we use the number to implement randomization, and find the remainder of division of the number by 3 through the modulus operation, the last result is the door number which is large or equal to 0 and less than 3. _m_remove_door() is used for removing a door excluding the car behind it and the door that is picked.
Line 67 is setting the next state.
Line 69 is start of handling the state that gamer plays the second pick.
Line 70 and 71 test the number of door whether is the door which the car behind it, and set the caption of label by result.
Line 72 sets the final state.
In fact, in the lines from 51 to 59, the member function _m_pick_door() can be removed by using std::bind(), refer to section 2.3 Think about the Design. By using std::bind(), we can bind the the index of door to the _m_play() and make it as the event handler for the click of button.
Line 74 defines the _m_remove_door() to removes a door which is a goat behind it and is not picked by gamer. The parameter exclude is a door number that picked by gamer.
Lines 76 to 80 create a std::vector object that contains the index of doors excluding the one of gamer picked. So the result of vector only contains two doors.
Lines 81 to 85 choose a door in the vector randomly, if the door has a car behind it, change the choice to other one, the door which is chosen will be removed. A widget has two methods named enabled(), they are overloading functions void enabled(bool) and bool enabled() const, are used for setting or retrieving the state whether the widget can receive inputs from mouse and keyboard. If the enabled state of a button is set to false, the color of button text becomes gray and the button is not working while clicking on it.
Lines 86 to 97 prepare the text that asks gamer whether changes his choice after the first pick.
Now run the program. Verify that the shortcut keys Alt+1, Alt+2 and Alt+3 trigger the correct behavior. Press Tab key to navigate through the buttons with keyboard, the default tabstop order is the order in which the buttons were created.
In the previous chapters we provided examples of defining the form objects. They are usually local objects. When the local object goes out of scope, its destructor is called automatically. Sometimes we need to keep the object alive when it goes out of the scope: another way to create an object is to declare a pointer variable to the class of object and call the C++ new operator, which will allocate space for the object and call the constructor. In this case, the pointer variable must be explicitly deallocated with the delete operator. But the question is when shall we delete the pointer variable? In fact, we can create a form object by using form_loader. Nana C++ Library will manage the form objects created by form_loader and destroy the objects when the user closes the form. For example:
nana::form_loader is a template functor class. It creates an object of the template parameter class. This is useful when you create a form and don't want to take care about the lifetime of the object. Continuing with the next example, we see a form is created when the button is being clicked.
In fact, a form_loader object can be passed to some events() because it is a functor. Take a look at the above code: form would not be shown immediately after initialization, and the show() method is need to call explicitly after creating the form by form_loader. Therefore, only an invisible form created by the form_loader object we can get, if we pass the form_loader object like above code to the event. A way to achieve it is calling the show() method in that constructor of class, but in most instances, we are not enable to modify the code of the classes, and therefore we need a correct solution. The form_loader has two template parameters, the first is used for specifying a type of form, the second is a non-type template parameter and its type is bool named IsMakeVisible, used for determining whether making the form visible. So, we can specify the second template parameter by giving true, like this.
See also this discussion.
Modal form is a modality of forms. It would handle all interactions with the user while the form is active. This is what makes the form modal, the user can not interact with its owner window until the form is closed. Modal form is useful to block the program execution and wait for a user input. For example:
Call nana::API::modal_window() to enable modal form. Only if an owner is specified for the form initialization, will be the form enable as modal form. The object fm in function foo() is created and specified ei.window as its owner. The ei.window refers to the form that is defined in function main(), and passed by the event argument.
A window has an appearance. This appearance can be specified when a window is being created. To determine the appearance of a window there is a structure named nana::appearance with a bool member for each feature with can be included or excluded in the "apereance" of the windows form. But in practical development is hard to describe the style of the appearance using the struct nana::appearance. If a form would to be defined without min/max button and sizable border, then
This piece of code may be confusing because of the 5 parameters of the constructor of nana::form. So the library provides a helper class for making it easy. For better readability and understandability Nana provides three templates classes to generate an appearance object: nana::appear::decorate, nana::appear::bald and nana::appear::optional. Each provide an operator that return a corresponding nana::appearance with predefined values.
These templates generate appearances. Every template receives the template parameters for specifying the attributes of the appearance.
template nana::appear::decorate is used for creating an appearance of a window with "decoration". A window decoration in Windows is called the non-client area, such as title bar.
We can create a form without min/max button and sizable border like this:
The appearance created by appear::decorate<>() has a titlebar and borders that are draw by the platform- window manager. If a window needs a minimize button, it should be:
nana::appear::bald is used for creating a window without decoration.
The appearance created by nana::appear::bald<>() has no titlebar and no 3D-look borders.
The appearances of these figures were created by templates without specifying the template parameters. Each template provides some parameters, and each template parameter name indicates what attribute is supported by the template. For example template nana::appear::decorate receives the parameters nana::appear::minimize, appear::maximize, appear::sizable, appear::floating and appear::no_activate. So, creating an appearance with decoration that has a minimize button and maximize button will be:

The nana::appear::optional is used to create a window with decoration depending on the first non-type template parameter.
There is a feature for these templates: the order of template parameters does not affect the order of explicit specifying template parameters, the name of template parameters just tell you which attribute can affect the appearance. For example:
nana::appear::decorate<appear::minimize, appear::maximize>() creates an appearance that is the same as the result created by nana::appear::decorate<appear::maximize, appear::minimize>().
nana::appear::decorate<>() creates an appearance that is the same as nana::appear::decorate<int, int, int, int, int>(), because the type of int is not wanted.
The parameter of class template nana::appear::decorate can be minimize, maximize, sizable, taskbar, floating.
The parameter of class template nana::appear::bald can be taskbar, floating.
The parameter of class template nana::appear::optional can be true, false, taskbar, floating.
Event is a messaging mechanism provided by the window system. Various kinds of events are generated by the window system for notifying the application. A key or mouse event is generated when the user presses or releases a key or mouse button, and the application can receive the event and respond to user actions.
The different window systems provide their own patterns of messaging mechanism. Nana implements an abstract pattern of event mechanism to hide the difference between different window systems.
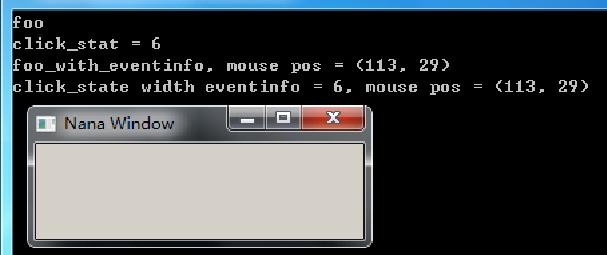
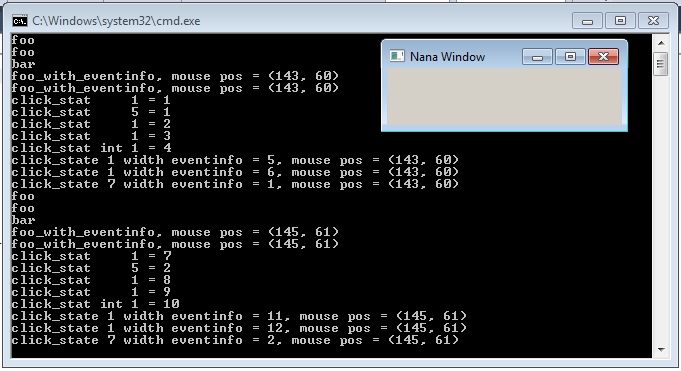
To respond to the click action generated by any specified button, we need to make the click event for the button.
As shown in above code, events() is a member template of class widget, and it is used for registering an event handler. The above code makes a click event for the form object. When the user clicks the body of the form, Nana is responsible for invoking the function foo() registered as a handler of the specified event. Additionally, the function foo() can be specified with a parameter of type const nana::arg_click& to receive the information of the event. See details of nana::general_events are described in section 6.2.
The events() returns a handle of event handler if the registration is successful. The type of the return value is nana::event_handle. With this handle, we can delete the event handler manually. For example:
After calling the umake_event(), the foo() function would be not invoked when the user clicks the body of form. In most situations, we don't need to take care of deleting the event handler, because the event handlers will be deleted when the form is closed.
An event type describes a specific event which is generated by Nana. For each event type, a corresponding class is defined by Nana, which is used for referring to an event type. The classes for event types are defined in the namespace nana, such as click, mouse_move and so on.
Every event contains some information. The information is sent to the application through a (const) reference to an eventinfo object in event handler.
Nana.GUI provides some raw events, such as click, mouse_move and so on. Most of these events can work with all widgets implemented by Nana.GUI, but some of them are individual, like unload for root widget and elapse for timer.
Every widget has an interface for registering an event, named events().
: nana::general_events and nana::event_arg
| Event | argument | Description |
|---|---|---|
| nana::general_events::click | nana::arg_click | A mouse click event. |
| dbl_click | nana::arg_mouse | A mouse double click event. |
| mouse_enter | nana::arg_mouse | A mouse enters a widget. |
| mouse_move | nana::arg_mouse | A mouse moves over a widget. |
| mouse_leave | nana::arg_mouse | A mouse leaves a widget. |
| mouse_down | nana::arg_mouse | A mouse button is pressed on a widget. |
| mouse_up | nana::arg_mouse | A mouse button is released on a widget. |
| mouse_wheel | nana::arg_wheel | A mouse scrolls the wheel on a widget. |
| mouse_dropfiles | nana::arg_dropfiles | A mouse release over a window that is registered as recipient of drag and drop. |
| expose | nana::arg_expose | the visibility changes |
| resizing | nana::arg_resizing | A widget's size is changing. |
| resized | nana::arg_resized | A widget's size changed. |
| destroy | nana::arg_destroy | The window is destroyed, but occurs when all children have been destroyed |
| focus | nana::arg_focus | A widget's focus is changed. |
| key_press | nana::arg_keyboard | a key is pressed while the window has focus. event code is event_code::key_press |
| key_release | nana::arg_keyboard | a key is released while the window has focus. event code is event_code::key_release |
| key_char | nana::arg_keyboard | a character, whitespace or backspace is pressed. event code is event_code::key_char. The nana::focus widget received a character. |
| shortkey | nana::arg_keyboard | a defined short key is pressed. event code is event_code::shortkey. The widgets received a shortkey message. |
| nana::move | nana::arg_move | the window changes position |
A user-defined event function may have a parameter of type const nana::event_arg& for querying the event information, such as mouse position.
events() members like click() return a handle for uninstalling the associated user-defined event function and Nana.GUI destroys the user-defined event function automatically when the widget is beginning to get destroyed.
This just describes these raw events, but some widgets like nana::treebox provides some high-level events, such as expanding a node. These details are only described in its reference.
For different events, the event_arg contains different structures for these event types. The following paragraphs describe the details of nana::event_arg.
The mouse is an important and convenient input device. The user controls the mouse cursor on the screen by moving and clicking the mouse. If the mouse cursor moves over on a widget, the system would generate a nana::general_events::mouse_move event to notify the program to which the widget belongs. The structure of mouse events uses the nana::arg_mouse:
The structure of mouse wheel event contains nana::arg_wheel:
In an event handler function, we can refer to the structure by using nana::event_arg or some other base argument. For example:
When the user clicks a mouse button and the mouse cursor is in a widget, the widget receives a click event that is generated by Nana.
To receive a mause event, register the event with the types:
This event is sent to a widget when the mouse cursor enters/leaves the widget.
This event is sent when the user presses/releases/moves the mouse while the mouse cursor is in a widget.
There are four different kinds of keyboard events in the Nana C++ Library:
A window system usually uses an input focus to represent a window which would receive the keyboard events. In general, the user clicks on a window to set the input focus in the Nana C++ Library. Additionally, the program can set which window gets the input focus by calling nana::API::focus_window(window wd) or the member function nana::widget::focus().
The structure of a keyboard events contains:
As the definition shown, the members key and ignore are defined as mutable, this feature will be explained later.
When the users hits the keyboard, the nana::key_press event would be generated when a key is pressed down, and the nana::key_release would be generated when the pressed key is released.
The key_char event is an abstract event. A window system usually translates the keys into characters. For example, to type a Chinese character one usually needs to hit in the keyboard more than one key and the window system translates these keys into a Chinese character and then a key_char event is generated and sent to the program.
The two members, key and ignore, are defined as mutable in the structure of key event. It is used to modify the state of key_char event. During key_char processing, if the member ignore is set to true, Nana will ignore the key. For example, when a program is designed to receive the a number as input, the program should test the key in key_char event, and set the ignore to true if the input char is not a digit. Like in the code below:
See Enable PNG
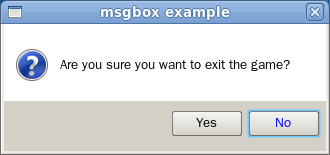
The class nana::msgbox is used for displaying a modal dialog box to prompt a brief message. A brief example.
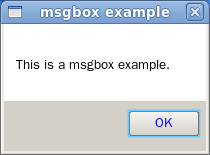
The msgbox has a C++ stream-like style, so we can easily display strings, numbers and all objects whose type overloads an operator<<() for std::ostream. Sometimes, the application should ask the user for a decision, for example, ask the user whether to exit.
There are two interfaces to set an icon for a window which is a root_widget, such as form and nested_form, thay are defined in namespace nana::API.
window_icon_default() sets a default icon, and after calling it, all windows will set the default icon automatically while they are creating. Although the Nana C++ Library is aimed for cross-platform, there is a distinction in Nana between Windows and Linux(X11). The icon of a window only could be an ICON file in Windows. If cross-platform is desired, the code should be treated differently.
On Windows, the window icon is the icon of the executable file. Usually the icon file is stored in the executable file's resource section. To set the icon resouce for the window, we just open the executable file with class image. Like this:
or
Posted in Nana C++ Library | Tags: c++, Cross-platform, gui, nana
 1.8.5
1.8.5 
